Android Applications
Here are basic android apps developed for the purpose of having working pieces of codes for particular functionalities. For example an app to receive user touch input. They are provided such that you just have to copy-and-paste already written code. You are to first successfully copy, paste, build and run the app before doing anything else.
The reader is assumed to know what is meant by a source code, and be familiar with the Command Line Terminal of the Ubuntu OS.
Contact us to report broken links and errors.
Contents:
- Get everything ready
- List of available apps
- Why the app may not work
- References
Get everything ready
The procedure uses the Command Line Terminal and was tested with a freshly installed Ubuntu 12.04.
1. Install JRE, JDK and Ant
JRE stands for Java Runtime Environment.
JDK stands for Java Development Kit.
Open the command line terminal then:
- Execute: java
- Execute: javac
- Execute: ant
For each of the three cases, if an error message is produced then it will tell how to install. For example:
- Execute: sudo apt-get install openjdk-6-jre
- Execute: sudo apt-get install openjdk-6-jdk
- Execute: sudo apt-get install ant
2. Get the Android SDK
Download the Android SDK (Software Development Kit) for Linux. This may be a file called 'android-sdk_r22.0.4-linux.tgz' which has a size of 105 MB. Download and extract this file. Suppose you extract into a folder called 'Android'. It will now contain a new folder called 'android-sdk-linux'. Read the short Readme.txt file in there. Open the Command Line and change directory to 'Android'.
3. Add Platforms and Packages (read more)
You are in the directory 'Android' that contains the directory 'android-sdk-linux'.
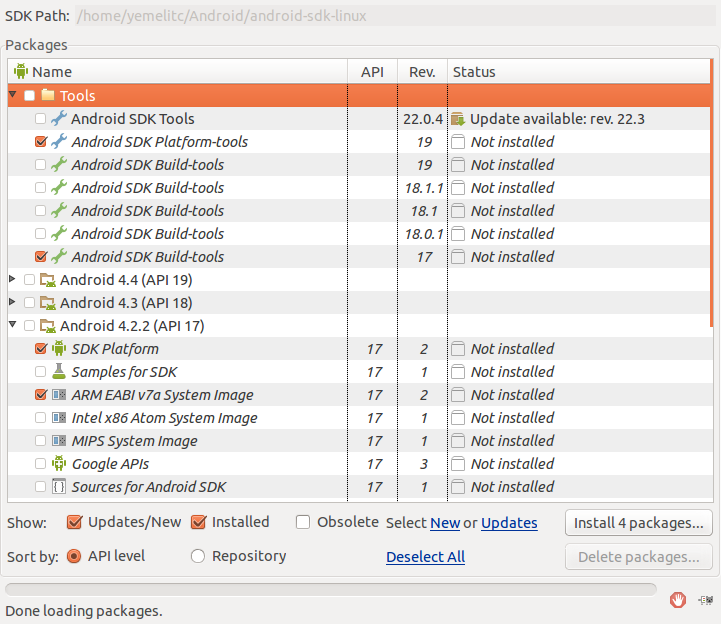
- Execute: ./android-sdk-linux/tools/android
This opens the Android-SDK-Manager (view image).
- Select the platforms and packages you want to install, then click on Install.
You are of course recommended to select the latest versions. Wait quite some time for the installation to complete... assume 500 MB will be downloaded!
4. Create a Project (read more)
You are in the directory 'Android' that contains the directory 'android-sdk-linux'.
- Execute: ./android-sdk-linux/tools/android list targets
This prints a list of the available Android platforms that you've downloaded for your SDK. Find the platform against which you want to compile your app. Make a note of the target id. You are recommended to select the highest version possible. You can still build your app to support older versions, but setting the build target to the latest version allows you to optimize your app for the latest devices.
- Execute: ./android-sdk-linux/tools/android create project --target <target-id> --name MyFirstApp --path <path-to-workspace>/MyFirstApp --activity MyFirstApp --package com.example.myfirstapp
Replace <target-id> with an id from the list of targets (from the previous step) and replace <path-to-workspace> with the location in which you want to save your Android projects. Suppose it is simply '.' so to mean the current directory. Then the directory MyFirstApp is created.
5. Build and Run a Project (read more)
You are in the directory 'Android' that contains the directories 'android-sdk-linux' and 'MyFirstApp'.
- Make sure an Android device is connected to the computer.
Or the emulator AVD (Android Virtual Device) is running (more below).
- Change command line directory to 'MyFirstApp'.
- Execute: ant clean
This ensures a total rebuild of the project.
- Execute: ant debug
This compiles the project.
- Execute: ../android-sdk-linux/platform-tools/adb install ./bin/MyFirstApp-debug.apk
This may not work if the app already exists.
In that case, add '-r' as shown below:
Execute: ../android-sdk-linux/platform-tools/adb install -r ./bin/MyFirstApp-debug.apk
- On the device or emulator, locate the added or replaced app and launch it.
6. Create an AVD (read more)
You are in the directory 'Android' that contains the directory 'android-sdk-linux'.
- Execute: ./android-sdk-linux/tools/android avd
- In the Android Virtual Device Manager panel, click New.
- Fill in the details for the AVD. Give it a name, a platform target, an SD card size, and a skin (HVGA is default).
- Click Create AVD.
- Select the new AVD from the Android Virtual Device Manager and click Start.
- After the emulator boots up (launches), unlock the emulator screen.
List of available apps
- Simple android app to draw pixels to screen
- Simple android app to respond to user touch input
- Rhyscitlema Calculator on Android
Why the app may not work
Here are some reasons why the app may have a compiler error or more importantly a run-time error (does not work even after compiling, loading and launching successfully):
- You did not follow exactly the steps to Get everything ready. This is especially true when you copy-paste someone else project folder, in which case a file such as <project-folder>/local.properties will then have wrong information.
- You did not ensure a complete rebuild of the project. This is done by deleting the folder 'bin' found in the project folder. To do so execute: rm -r bin. But more appropriately, execute: ant clean.
- You forgot to add the package name (for example: package com.example.myfirstapp;) at the beginning of every source file.
- When trying to use your own class (like your custom view) in the XML layout definition, you forgot to add the package name. The package name with the class name gives the full class name required.
- You took a slight detour you were sure should logically work - the source of 90% of troubles!
- You tried to do something funny and lost your way back! Before you start experimenting on your source code, always fully backup your working code along with all the means to compile it, and maybe add a Readme.txt file for your own good!
References
http://developer.android.com